
Buttons and snaps are wonderful closures and are easy to apply to many garments. However, if you live somewhere that is prone to cold winds sneaking in between those buttons, then a you may find that a concealed zipper behind a windflap an absolute necessity!
The following instructions will help you convert the Grove Coat and Adult Pixie Coat to feature a concealed zipper. If you’re looking for instructions to make this conversion to the Children’s Pixie Coat or to a Pathfinder Vest, then please see our legacy guest blog post, How to Add a Concealed Zipper to your Twig + Tale Coat or Vest.
![]()
Materials:
- Pixie Coat or Grove Coat pattern pieces
- Suitable sized zipper (see Selecting a Zipper)
- Measuring tape
- Scrap paper (for adding seam allowance if directed)
- Tape
- Ruler
- Pencil
Selecting a Zipper:
Measure the front straight length of your coat pattern, and choose an appropriate length open-end/separating zipper. Zips are generally available in 2" (5cm) increments so they may not go all the way to the bottom rounded front corner of the coat.
Preparing the pattern pieces:
Pixie Coat:
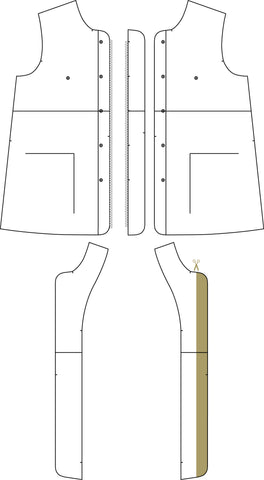
The first step to prepare the pattern pieces for a Concealed Zipper is to transfer the cut line from the left Front onto the left Front Facing and trim off the front edge, as picture in the cutting diagram.
Then your cutting list will be mostly the same as written in pattern - but for the outer Front and Front Facings will be as follows:
- Cut 2 Fronts as a mirrored pair, with the curved edge kept unchanged
- Cut 1 right Button Stand as shown in the cutting diagram
- Cut 1 right Front Facing
- Cut 1 modified left Front Facing
Please Note: this cutting layout will create a zip flap that is easier for a right handed person to use. Flip all the pieces to create a zip flap for a left handed person.
Grove Coat:

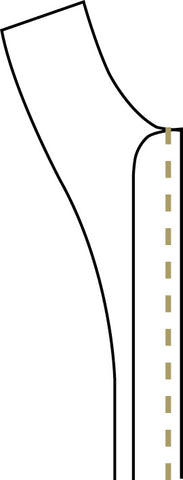
The first step to prepare the pattern pieces for a Concealed Zipper is create 2 left Front Facing pattern pieces, and then trim them as shown in the cutting diagram above.
Draw a vertical line 2" (5cm) from the straight edge of the inner lining side. Slice off the strip of pattern piece that contains the front edge and discard this piece (shaded gold in the illustration above), retaining the lining side. This is now effectively your button loop strip.
With the other left Front Facing, draw a vertical line 2 3/4" (7cm) from the straight edge on the lining side of this left Front Facing. Slice off the thin strip of the pattern piece that contains the curved front edge. Discard the wider strip (shaded gold in the illustration above), the thin slice is the piece you will retain.
Then your cutting list will be mostly the same as written in pattern - but for the outer Front and Front Facings will be as follows:
-
Cut 2 Fronts as a mirrored pair, with the curved edge kept unchanged
-
Cut 1 Front Facing, right side up as shown (right Front Facing)
-
Cut 1 modified left Front Facing, trimmed to 2 3/4" (7cm) wide
-
Cut 1 modified left Front Facing, trimmed to remove 2" (5cm)
Please Note: this cutting layout will create a zip flap that is easier for a right handed person to use. Flip all the pieces to create a zip flap for a left handed person.
Installing the Zipper:
1. Sew your coat as instructed in pattern, until your outer is ready, but your facing & linings are not yet attached to each other. Remember that you will be using one modified Front Facing, with the curved front edge trimmed off.
Please Note: When making the Pixie Coat, use the sewing instructions for the horizontal buttonholes version.
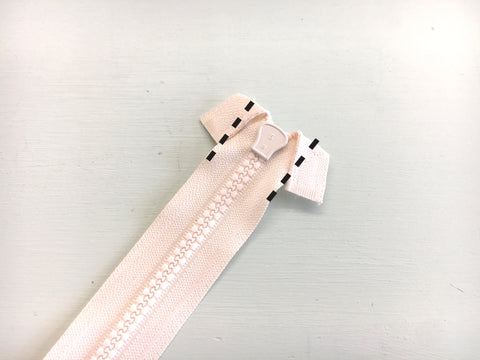
2. With the zipper right side down, fold over the top edges of the zipper tape and stitch them in place as shown by the black lines on the photo.
3. Seperate your zipper sides. Take the zip’s right side, position it right sides together onto right Front exterior, along the front raw edge. Baste in place with a 3/8” (1cm) seam allowance. Alternatively, you may choose to use a water soluble transparent tape, such as Wash Away Wonder Tape, to tape the zipper in place.
4. Baste the left side of the zipper to the straight edge of the Button Loop Strip.
To make sure that everything is lined up properly, reattach the zipper halves together and zip them up. Check to see if the top and bottom of the Front and Button Loop Strip are aligned, if not, then remove the basting on the Button Loop Strip, and realign the pattern pieces and baste again.
Once everything is aligned evenly, unzip and separate the zipper halves, and stitch them in place with a 3/8” (1cm) seam allowance (over the basting stitches).
Please Note: the following illustrations show the Pixie Coat pattern pieces, but the method for the Grove Coat is the same.

5. It is now time to attach the Button Loop Strip to the modified Front Facing. Align the layers along the straight raw edge, right sides together, with the zipper sandwiched in between.
Pin into place and sew with a 3/8” (1cm) seam allowance - along the same stitching line that you used to attach the zipper.
You can now sew your facings and linings together, as directed in your pattern tutorial.
Your combined Right and Left Lining and Facings should look similar to the following image:
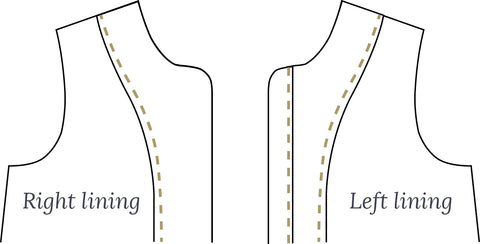
Its good to double check your zippers at this point, and make sure everything is still aligning nicely. Reattach the zippers, and assess the pieces, and if everything is looking correct then you can admire your work so far!
6. Unzip the pieces and continue to finish assembling your coat as per the instructions in the Tutorial.
If you are choosing to sew the optional topstitching as mentioned in the pattern instructions, then we recommend you also take this opportunity to topstitch the edge of the facing next to the concealed half of the zipper.

Enjoy your new zip-up and chilly wind proof coat!
![]()
Read more Twig + Tale sewing tutorials here:
- How to Add a Concealed Zipper to your Twig + Tale Coat or Vest
- Adding a Zipper to Outerwear - Children's Pixie Pea
- How to Add a Knit Cuff
- Interlining a Garment for Warmth
- Convert the Nestledown Vest for Back Wearing
~ Lovely cover image courtesy of Lolie Yergeau ~


