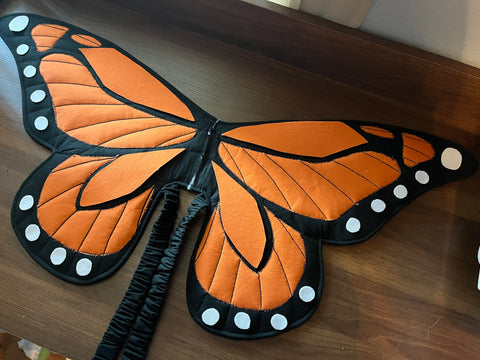
Welcome to Part 4 of the Wings Sew-Along. It's now time to work on the magical wing appliqué - have you decided on your accent fabric(s) yet? I ended up changing my mind several times, but am happy with my choice in the end!

Completing the appliqués on the Wings is quite transformative. It completely changes the look of the wings - adding all those interesting, beautiful details inspired by nature or fairy tales. But their functions is more than just cosmetic - adding the appliqué is also key to adding some of the necessary structure.
Goals for Part 4:
- Trace appliqué pieces on to interfacing
- Fuse appliqué pieces to interfacing
- Cut appliqué pieces
- Glue appliqué to wings to position
- Stitch appliqué
Before we begin the process of creating our wing appliqué pieces, I'd just like to show you and before-and-after of the difference that the appliqué makes to the structure of the wings. On the left, before the appliqué, the wing still has some flop to it. On the right, the appliqué has added a lot of extra rigidity to the wing:

Remember that every line of stitching added to the wings contributes to the structure and stability. During testing, we found that machine-stitching provides much better structure than hand-stitching. While we love the look of hand-stitching, it is best reserved for decorative purposes on the wings.
Trace, interface, and cut appliqué pieces ("Adding Appliqués" in tutorial)
Tracing the appliqué pieces is another perfect “craft time” activity. Sit down with your children, and enjoy some creative time together. It is fine to rough-cut the interfacing pieces at this point, as they will be trimmed precisely once fused to your appliqué fabric. It is a good idea to label the pieces, as some of the wing types have a fair number of similarly-shaped appliqué pieces and it helps keep them sorted!
Fuse the appliqué pieces to your fabric, then cut out all the shapes precisely.
You may have already done this for the Monarch Wings, if you chose to prepare them earlier - if so, move on to the next step!
Glue appliqué into position
During testing, Lisa discovered that a glue stick works wonderfully for positioning all of those appliqué pieces on the wings! My preference is to “map out” the placement of the pieces without glue, placing them all to plan what order they will be applied in (and admire how pretty they look). Then, when I know what my plan is, I position one appliqué area at a time with glue (may be one or more pieces), and sew before glueing the next area. Here, I've glued a single large piece in preparation for stitching:

Stitch appliqué
Appliqué can be stitched on with a straight stitch, or a zigzag stitch of various length/width combinations. I chose to do a fairly dense zigzag stitch so that the edges of my linen and velvet pieces don't fray. This step takes some time, especially if using a small zigzag stitch - I spent at least an hour sewing on my appliqué.
Here's a little sampler to demonstrate some stitch length/width combinations I tried out before sewing my wings - take some time to experiment a little bit to find what works for you.

When stitching the appliqué pieces with a zigzag stitch, aim to have the needle just over the edge of the appliqué on the right side, so that the edge of the appliqué piece will be enclosed with stitching. Work slowly around the curves, stopping with the needle down to lift the presser foot and manually adjust the wings to ease around curves.

Here is a detail of my finished appliqué, done with a .75 stitch length and 2.5 stitch width (it was between 1mm and buttonhole on my stitch length dial).

If you are sewing the Monarch Wings:
Part of your appliqués will have already been completed prior to quilting - however, you will want to stitch back around them now through all the layers to help give the Wing some extra structure. Then you will apply your remaining, unstitched appliqués as above.


Bravo! Look how much progress we made in Part 4. The appliqué is really quite magical, bringing the wings to life with colour, texture, and pattern. Be sure to take some time to admire your lovely work!

We'll be back soon with the final part of the Wings sew-along, allowing time to approach the tasks in Part 4 at a fairly leisurely pace.
If you have any questions or comments, please leave a comment on the Twig + Tale Chat Facebook group.
Also, please feel free to share photos of your wing progress on the Twig + Tale Chat Facebook group or on Instagram tagged with #TTWings, #TTWingsSewalong and @twigandtale. We'd love to hear how things are going!

<Cover image by Elle Narbrook>

