Though it may seem intimidating at first, learning to do an FBA (Fuller Bust Adjustment) can really improve the fit of your handmade garments. Give it a try - we think you'll be pleased with the results!
These step-by-step instructions will guide you through doing an FBA for a top with bust dart shaping. We also discuss changing the position of the dart based on your specific measurements - sometimes the adjustment may be as simple as moving the dart up or down so that it sits at the right position for your body.
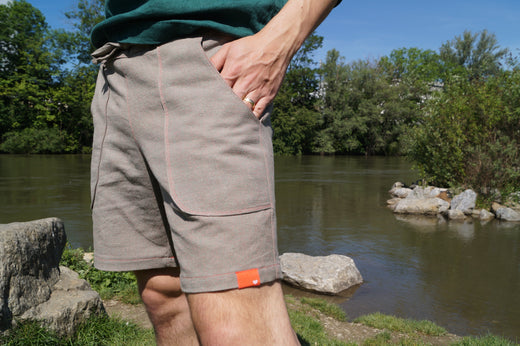
We're demonstrating the method using the Scenic Top, but these instructions can be used for any top that is shaped with side bust darts, such as the Vista Top or the Plains Dress.
Materials
Gather some basic materials to adjust the pattern pieces:- Top Front pattern piece (we're using the Scenic Top)
- measuring tape
- scrap paper
- tape
- ruler
- pen/pencil
- scissors
Measure
To determine the size of adjustment necessary, measure your upper bust and full bust.
The upper bust measurement is taken around the body, with the tape snugged up to the underarms, and above the breasts.
The full bust measurement is taken around the fullest part of the breasts.

Compare your body measurements to the size chart in the pattern tutorial.
| Size H | Your body measurement | |
| Upper Bust measurement | 34" (86cm) | 34" (86cm) |
| Full Bust measurement | 36" (91cm) | 38" (96cm) |
Bust Apex
The dart is intended to “point” to the fullest part of the bust or the bust apex when the top is worn.
The bust apex is marked on the pattern. It is a good idea to measure your own bust apex to make sure the bust dart ends up in the correct position for your body.
To find your personal bust apex, measure from the outside corner of the body on the shoulder bone (the position where a shoulder seam line would sit) to the centre of your bust - this is the part that points out the most. Note that the bust apex is not necessarily the same as your nipple position. We recommend taking this measurement while wearing your favourite underwear.
When taking a comparison measurement on the pattern it is taken from the stitching line on the outside corner of the shoulder seam to the bust apex point marked on the pattern.

Check your measurement against the pattern.

Keep a note of the difference between your bust position versus the pattern. For example:
| Pattern | = 9.8" (25cm) |
| Your Bust Position | = 11.8" (30cm) |
| Difference | = 2" (5cm) |
Full/Small Bust Adjustment
Adjust pattern pieces
1. Begin by drawing cut lines on the Front pattern piece:
a. Line parallel to Center Front (CF) from the hem to the end of the dart (line a on diagram below).
b. Line at right angles to CF from the dart end to CF line (line b on diagram).
c. Line through centre of dart to dart point (line c on diagram).
d. Line from dart end to stitch line of armhole seam (line d on diagram).

2. Cut the pattern along these lines, keeping the pivot points intact at dart end and armhole seam (see diagram above for location of pivot points). If you accidentally snip through the pivot point, use some tape to create a hinge.
Be sure to mark the original dart end so you don't lose it in the changes. This is VERY important.

For the following steps, it is a good idea to position your pattern piece over a larger piece of paper, so that once the adjustments are made, you can cut around the entire finished piece. This prevents things from shifting around so much.
3. Secure the top section of the pattern piece with tape, then draw a line extending the CF edge below the pattern piece.

Now, apply your full bust difference to the pattern. In our example, the full bust difference is 2" (5cm). Divide the difference in half: for example 2" (5cm) / 2 = 1" (2.5cm) because we are working on half of the front piece.
Slide the side section over by your calculated difference: our example is 1" (2.5cm). Let the dart and armhole pivot - the side will move down and the dart will open.

4. Slide the centre section down by half the amount the side section slid out in the previous step, so 1/2" (1.25cm), along the CF line you drew earlier.

5. Redraw the dart stitching lines so that they meet at the point of the original dart end (note that for a Small Bust Adjustment, the dart end may slide underneath the pattern piece).

6. Blend the hem and smooth the armhole if needed.

You may choose to create a cutout in your dart if the dart ends up too wide at the side seam.

7. The adjustment is complete , however, if the location of your Bust Apex is different than the pattern, we'll continue below with a few more steps.

![]()
Modifying the Bust Apex
The dart should be positioned so that it points directly towards the Bust Apex. It may be necessary to move the dart up or down so that it is positioned correctly. This adjustment may be all that is needed to improve the fit of a top with dart shaping.
1. Cut two lines at right angles to the Centre Front Line, above and below the new dart.

2. Slide the darted section down or up by the difference. In the example above, we calculated the difference as 2" (5cm) lower, so we will slide the piece down by that amount.

3. Blend the side seam on both sections.

4. Your pattern piece is now ready to use!

Remember, we always recommend sewing a muslin to test out your pattern adjustment before cutting into your fancy fabric.
Making pattern adjustments may seem a bit daunting at first, but the effort is completely worth it to achieve a beautiful, handmade garment with a custom fit.
If you have any questions about sewing or making adjustments to the Scenic Top, please feel free to join us at the Twig + Tale Facebook group.
![]()
Read more pattern adjustment tutorials here: