
The bound Hong Kong seam finish uses bias binding to enclose the raw edges of a seam. The result is a beautiful, neat finish, with the seam laying open for reduced bulk. We like to use a contrast binding fabric for a fun pop of colour on the inside of a garment!
Hong Kong seams are particularly useful for finishing unlined garments. They would be a beautiful finish for an unlined vest, coat, or cloak.
![]()
Materials
- Bias binding - 1" - 1 1/4" (2.5 - 3cm) wide bias binding, unfolded. (If using pre-made bias binding, press it flat). You'll need twice the amount of binding as the length of the seams being finished.
Binding the seams
Note - we recommend cutting out your pattern pieces with some width added to the seam allowances when using this binding method, since 3/8 (1cm) would be very fiddly to bind. We recommend cutting your garment using a 1/2"-5/8" (1.25 - 1.5cm) seam allowance.
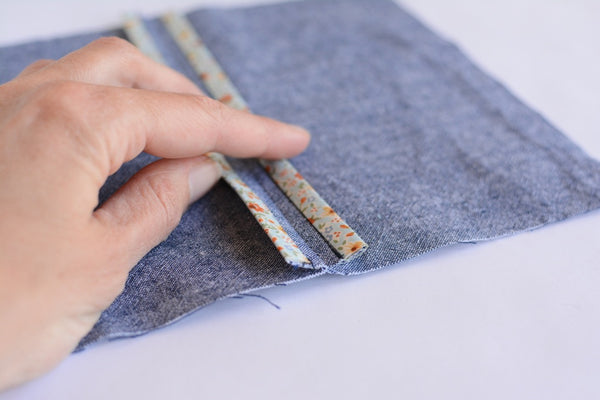
1. Begin with a seam that has been pressed open. Cut bias binding to the length of the seam, plus a bit of wiggle room at each end.
Place the bias and one side of the seam allowance right sides together and pin in place. (In this photo, one side of the fabric has been folded out of the way so that it's easier to pin the binding to the seam allowance).

2. Sew the binding to the seam allowance using a 1/4" (6mm) seam.

3. Open up the seam allowance and press the bias binding away from the seam.

Here's how it will look when pressed:

4. Wrap the binding around the edge of the seam allowance, enclosing the raw edge, and press. Note that the binding on the back of the seam allowance will be flat (not folded double) - this helps to reduce bulk in the seam.

Here's how it will look with the binding wrapped around the seam allowance and pressed:

5. Working from the right side, stitch in the ditch between the seam allowance and the binding. This will catch the flat binding on the back of the seam allowance.
Tip - try to avoid stitching over the binding. By stitching right in between the binding and the main fabric, the stitches will be almost invisible from the right side. A line of stitching will be visible on the back side of the seam allowance.

6. Trim the excess binding from the back of the seam allowance to 1/8" (3mm) from the stitch line.

7. Repeat all steps to bind the other side of the seam allowance.

Imagine a garment with the seams neatly finished with bound seams in a contrast fabric - so beautiful! This finish takes some extra time, but the result is an heirloom-quality garment that is as beautiful on the inside as on the outside. Enjoy!
![]()
Read more Twig + Tale sewing tutorials here:


