As the PDF pattern community continues to grow, exciting changes in technology means that the way many use sewing patterns is changing. In recent years, this has included the use of digital projectors being used as a resource- and time-saving alternative to printing and taping patterns. In response to these emerging techniques being used by the sewing community, we offer Projector files for Twig + Tale sewing patterns.
This alternative Projector file format allows Projector users to enjoy an optimized experience with their sewing patterns, as a complimentary value-add to our patterns. They've been included some time now with new releases, and we have been busy updating older patterns to include these optimized Projector files as well – we’re pleased to announce that you can now enjoy them with most Twig + Tale patterns!
We’d like to provide those who are curious about this technology with a basic overview of what they are and how they are used, as well as additional resources you can seek out for even more information about making a Projector work for you.

WHAT ARE PROJECTORS AND HOW ARE THEY USED?
You may already be familiar with digital projectors - they are often used for displaying movies, presentations, and more in the home, office, and school settings. They are often set up to project onto a large surface such as a wall or screen to allow for large-scale viewing.
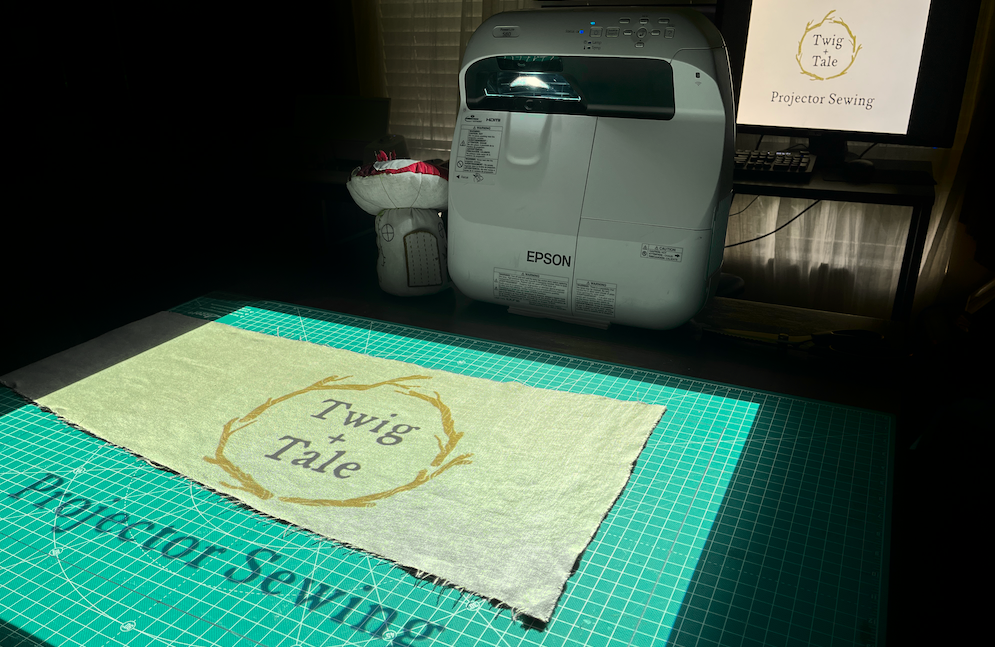
For sewing purposes, many of these same projectors can be used by sewists to display images downward onto a horizontal surface, such as a cutting table + mat. By doing this, it is possible to project a digital pattern directly onto fabric positioned below cut it directly, eliminating the need for a paper pattern entirely.

Will the projector I already own work for sewing?
The simple answer? It depends.
Some projectors will be more suited than others, due to a variety of factors. These will depend both on how you desire to use it, as well as the specifications of the projector itself. Your needs may be defined by the space you wish to set it up in; limitations in your ability to amount to a wall or piece of furniture; how mobile you need your projector setup to be; and more.
What type of projector do I need, then?
That answer is often as unique as the sewist using it! Setups can vary quite a lot – we’ve shared a number of examples by some of the creative sewists in our Twig + Tale Chat group on Facebook at the end of this post to show some different options to consider. Whatever your need, there’s a solution for you.
Projectors are available in a few different types.
- “Mini projectors” are one of the more common types used, as they tend to be easy to find and less expensive than other options. These often need a good amount of distance between projector and surface (or “throw”) to create a usable picture, and so they often work best for those with relatively tall ceilings and the ability to mount to the ceiling or wall.
- “Short throw” projectors are an option that many with short ceilings may choose to get, or when a person needs to attach to a freestanding stand or piece of furniture. They don’t require as much “throw” distance and so can be mounted closer to the cutting surface.
- “Ultra short throw” projectors, or USTs for short, are one of the most versatile options, as they can sit even on the cutting tabletop and still provide enough useable projection. They are also easy to put up and store away, and so a popular option for those who need to be able to cut in a shared space where leaving a projector mounted is not practical.
How you need to connect to the projector may be a deciding factor for you as well.
- Many sewists will simply connect their computer, laptop, or tablet to the projector via a cord, which may need to be hanging or tacked to the wall for a ceiling-mounted projector. This may be a challenge for some, though, depending on their equipment.
- Others will use a wireless means of connecting – either via built-in WIFI capability in the projector, or by use of other “casting” abilities like Chromecast or Bluetooth devices.
WHAT ARE THE PROS AND CONS OF USING PROJECTORS?
Like many things, projector use has its ups and downs, in terms of user friendliness, practicality, and more.
Some benefits include:
Time Savings:
For most sewists who use projectors, saving time is identified as one of the main benefits. There is no doubt that printing and assembling PDF patterns can be a barrier, especially when sewing time is limited, and A0 printing can be a costly alternative for some over time. Projecting patterns can eliminate this step entirely.
Resource savings:
Using a projector eliminates the need to use paper and ink/toner cartridges for printing patterns, allowing for more limited use of these precious resources.
Cost savings:
Over time, a projector can save money spent on ink and paper (for home printing), or for A0 printing at the copy shop. For those who like to sew a lot of different patterns, the cost of the projector can be recouped relatively quickly through savings on printing patterns.
Storage space:
There is no doubt that storing paper patterns takes up space and can be an organisational challenge. Using digital files saves on physical storage space.
Mobility challenges:
Projectors may be a good option for those with arthritis or other functional hand limitations, by eliminating the need to cut and tape patterns and therefore allowing the steps of cutting and sewing fabric to be completed with greater ease.
Pattern placement and marking:
A projected pattern makes it simple to visualise and position pattern pieces precisely when using prints, fabric panels, or border prints, as the paper pattern is not covering the print of the fabric. Pattern markings, such as pocket placement lines, are easy to see and transfer to fabric.
Pattern hacking
Many sewers find that projectors make it really easy to “hack” different features of patterns together, since they eliminate the need for printing and assembling all those patterns. Just open one pattern, cut what you need, and move to the next!
---------
Of course, there can be some challenges and limitations for some in using a projector for sewing patterns as well. (Many of these points are related to the setup and initial learning curve – they are more issues to be aware of going in, rather than long-term challenges. We will provide some great resources on how to tackle these challenges as well, so keep reading!)
Research and installation:
There is no "one size fits all" solution, so it will take research to decide on a projector type and setup that will work in your space. This can leave some sewers a bit bewildered when it comes to getting started. Also, some basic DIY skills are required to mount the projector, when choosing a mounted variety, or figuring out how to most effectively use an UST projector.
Initial cost:
Getting set up to project patterns has some upfront costs associated, including the projector, mount, cords and/or wireless adaptor. This can be increased if it takes a couple of iterations to find your ideal setup as well. Do your research and make sure that the initial investment will be worthwhile in the long run.
Calibration:
Calibrating the projector is simply how a user goes about making sure that the projector is displaying the pattern straight, and to-scale accurately. It can be a bit fiddly, potentially requiring some time and patience, especially the first time. However once mounted projectors have been calibrated they rarely need recalibrating – and after the initial calibration process, any re-calibration that needs done becomes quite quick and easy to do.
Space:
For a permanent projector installation, many sewers prefer to have a dedicated space. However, there are other options for using a projector in a non-dedicated space, such as installing the projector on a mobile mount or swing out arm, in a less-used or inconspicuous area, and more. USTs also make it possible to use a projector without a ceiling mount, and make setup and takedown easy.
Making pattern modifications or detailed “hacks”:
For those who like to modify or hack patterns for fit or style, it may be more challenging to do this with a projected image.
Basic modifications, such as sleeve or leg length, are simple to do “on the fly”, by simply cutting to where the adjustment is made, sliding the fabric, and continuing. However more complicated adjustments, such as a FBA are more challenging.
In this case, a "hybrid" approach may be useful, by projecting the pattern onto paper, tracing, and then modifying the pattern pieces, which still eliminates the step of needing to print and assemble a pattern prior to making adjustments. The adjusted paper pieces can then be saved for future use.
Alternatively, some sewers will use digital programs like Inkscape to make their adjustments digitally before projecting to cut fabric directly – but like any skill, these programs can have a bit of a learning curve to overcome.
If using a projector sounds like an interesting option for you to use in your sewing practice, the Projectors for Sewing Facebook group (or Projectors for Sewing – Australia + NZ for more local advice in these countries) offers a wealth of information about selecting, installing, and calibrating a projector, and a supportive and knowledgeable community willing to help get you started. You can find a wealth of knowledge at the Projector Sewing website or YouTube as well, if you are not on social media.
![]()
WHAT'S SO SPECIAL ABOUT A T+T "PROJECTOR FILE"?
CAN'T I JUST USE THE OTHER PATTERN FORMATS WITH MY PROJECTOR?
While it is possible to use A4/letter and A0 files for projection, optimised Projector files are much more user friendly, as they are created specifically with some of the challenges of projecting in mind. Following the guidance of best practices in the projector sewing communities, we've incorporated the following features into T+T projector files so that they are as clear and user-friendly as possible:
- Thicker strokes/lines for better visibility
- Calibration grids with options for inches or centimetres, able to be turned on and off as needed
- Enlarged fonts and symbols for legibility when projected
- All pieces oriented along the grainline for easier cutting
- “Unfolded” and “mirrored” pattern pieces, to allow for easier placement and less possibility of distortion from cutting on the fold
- Simplified labels
- Layered files
- Important notes included in boxes (with enlarged text) on Projector file
- Extra space around all margins and between pattern pieces to allow for scrolling as needed

(Note: As best practices have changed over time with the evolution of projector sewing, some files may not have all of these features based on when they were created. We are working to update these files over time to bring them in line with current recommendations, and will continue to work with projector sewing enthusiasts to make sure these continue to be as optimal as possible.)
![]()
A note on the "eco-friendliness" of projector use
While often touted as an ecologically responsible alternative to printing patterns, projectors are not devoid of environmental impact. Limited-impact paper is available, and paper is readily recyclable in many locales, whereas the effects of e-waste can be devastating when these devices are simply discarded at the end of their lives. We encourage users to consider this impact when making their own projector-purchasing decisions - taking steps such as:
- considering if it will be used enough to negate the amount of resources that may otherwise be used
- purchasing projectors secondhand where possible
- selecting a model based on longevity and the ability to make small repairs like changing bulbs, etc.
- ensuring that devices are maintained well, repaired whenever possible, and disposed of responsibly if/when they meet the end of their useful life
![]()
We are excited to be a part of how projector sewing technology evolves and changes and are so pleased to be able to offer these optimised projector files for Twig + Tale patterns, free of charge, with your pattern purchase.
However, fear not - for those who still prefer a paper option, your Twig + Tale pattern purchases will continue to include options for A4/US Letter home printing, as well as large-format A0 files, just as they always have been.
-----------
COMMUNITY PROJECTOR SETUPS
from our Twig + Tale Chat Group on Facebook


