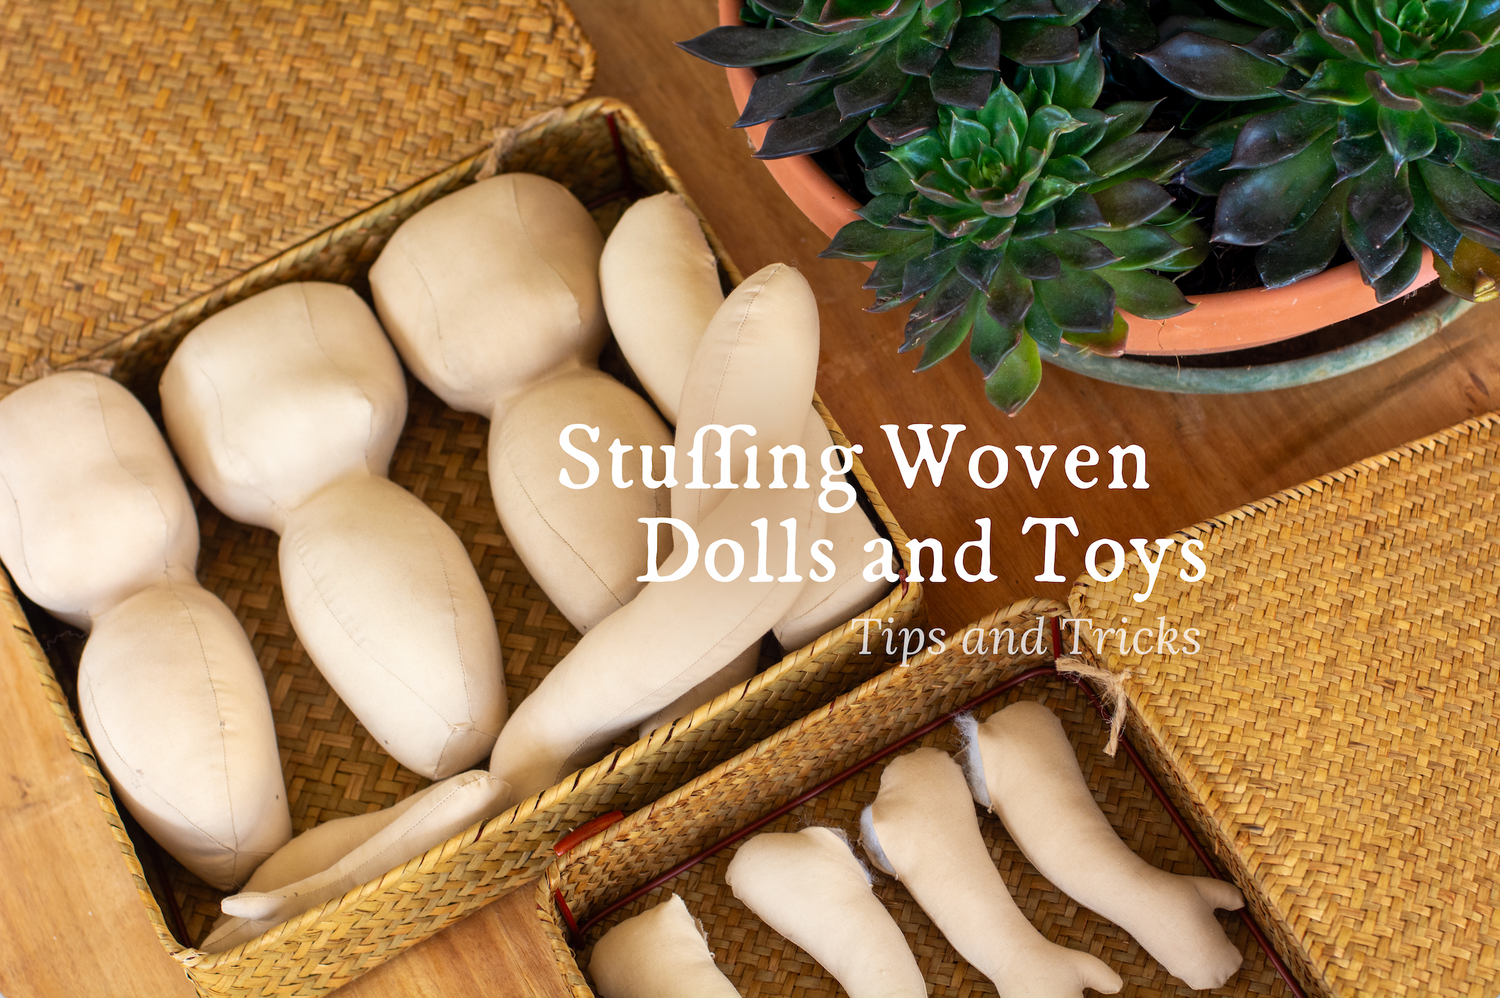
It's so fun to see a stuffed toy come together from a tangle of pieces into a new little friend. The act of stuffing is a step that can’t be rushed, as its outcome can make or break a project. Sitting down with a cup of tea and a fun tv show or podcast can really make it an enjoyable and satisfying experience!
I’ve put together some personal tips and tricks and some from the rest of the Twig + Tale® team to help you bring your toys to life!
![]()
Materials
Stuffing type and quality makes a difference - both to your end product and to your own experience. Stuffing choices can significantly change the finished look and feel - and weight! - of your toy. I like to use clean, carded wool, but there’s many different types of stuffing available for toy making. After you’ve tried a few different stuffing options you will likely find you have a favourite kind.
Toys can also be a great opportunity for recycling and repurposing discarded textiles, such as using shredded fabric scraps, well laundered old socks, tights & shredded old clothes that otherwise cannot be repurposed for other garments and projects.
Natural Fibres:
There are many styles and choices when it comes to natural fibres for stuffing; cotton, bamboo and wool are some of the most common. Natural fibres are regarded as a sustainable option, as they are a renewable resource.
A few natural fibre options include:
Carded Wool:
Carded wool is comprised of cleaned sheep wool that has been brushed to organise each of the individual fibres to align in one direction. Also sold as top or roving; once carded, the wool can be gently pulled out and used for a wide variety of craft projects in addition to stuffing! Carded wool holds its shape well, which also makes it a popular choice for dolls made of non-woven fabrics, like Waldorf style dolls.
Stuffing wool or core wool:
Made up of shorter, irregular wool fibres, stuffing wool is not brushed and aligned nicely, and looks more akin to a fluffy cloud as you might expect from toy stuffing. Naturally water and fire-resistant, wool is also recommended in toys for asthma sufferers.
Wool stuffing has a wonderful weight to it, and was used a lot in doll-making before the surge in synthetic fibres, so it can also help to give your toys a more vintage feel.
Cotton:
Cotton filling is another popular, natural option, and is often available in organic form. Dense and heavier than synthetic fibres, cotton adds a pleasing solid heft to a toy. Purchasing cotton fibre fill pre-shrunk is helpful if the toy is intended to be washed, as it can otherwise compress and shrink in unexpected ways.
Recycled Cotton:
Also sold as ‘Recycled fluff,’ this type of cotton filling is recycled and made from textile waste from fashion industries. This soft and fluffy filling is machine washable at low temperatures, making it especially appealing for use in little children’s toys that will often become soiled.
Bamboo:
Bamboo stuffing generally comes in two varieties: 100% bamboo fibre and a 50/50 mix of bamboo and another fibre like organic cotton or polyester. Hypoallergenic, bamboo stuffing has a texture similar to polyester fibrefill, though it feels a little more like silky cotton to touch. Because of the silky nature, this fibre hasn't got a lot of loft and so is more challenging to manipulate into shape.
I hesitated to include Bamboo amongst other natural options, as the large amount of processing involved in its creation means that its comparable to a manmade fibre. Bearing this in mind when choosing for yourself, it should be noted that it retains the breathability and biodegradable properties of other natural fibres.
Kapok:
Kapok is moisture-resistant, and quick-drying, and is a natural occurring fibre that grows on the ceiba pentandra tree, also known as the kapok tree. Though the fibre is too brittle for spinning, it weighs only one-eighth as much as cotton and so is commonly used as a stuffing alternative in its natural form for pillows and bedding where it's sometimes referred to as cotton silk. In craft suppliers, you will most readily find kapok stuffing sold as a vegan and hypoallergenic alternative for stuffing toys.
Hemp fibre:
Sometimes also known as Degummed Hemp Fibre and Noil Hemp Fibre (NHF), is available in fluffy traditional stuffing form, and also as carded fibre in a similar manner to carded wool. Hemp is an appealing renewable option that uses a lot fewer resources in its growth and processing than options like cotton or bamboo.
Synthetic Fibres:
Polyester:
Polyester Fibre Fill is one of the most common stuffings available on the market. It appears like cloud in a bag, and you can pull off larger or smaller pieces as you require. The other common form is known as Cluster Fibre Fill. It looks more like a collection of mini cloudlike puffs, and has the nice ability to fill small areas but puff up and fill pieces quite evenly.
Silicone filling:
Relatively new to the market, silicone filling is most often sold in a Cluster Fibre Fill form; little balls of silicone fibre. You can also purchase siliconised stuffing which consists of a natural or acrylic thread core, which has a coating of silicone on top. This process is designed to minimise allergic reactions and to resist bacteria and dust. This filling type is cold machine washable which adds to its appeal.
![]()
Tools
Using various tools in the stuffing process can afford you some wonderful precision, and make stuffing hard-to-access areas much easier. For long, skinny areas, haemostats or stuffing forks mean you can carefully place your stuffing exactly where you want it, and gently work it in to areas that you can’t otherwise fit your fingers into.
Haemostats are a kind of forceps, and can be purchased from medical supply stores, but many craft, sewing and hobby supply stores stock them for their versatility when working with precision.
Stuffing forks are a stainless steel rod, which is slotted at one end to grab the stuffing, with a larger handle at the other end for ease of use. To use a stuffing fork, you push the notched end of the tool into a small amount of stuffing, and then turn the tool in your hand until the stuffing looks a little like a cotton bud. You can then glide the tool to where you want to place the stuffing, hold it gently in place from the outside and slide the fork back out.
If you don’t have these tools, then point turners, bamboo stilettos, thin pieces of dowel, or the eraser end of a pencil can also work wonderfully to help you press stuffing into the furthest corners of your toy.
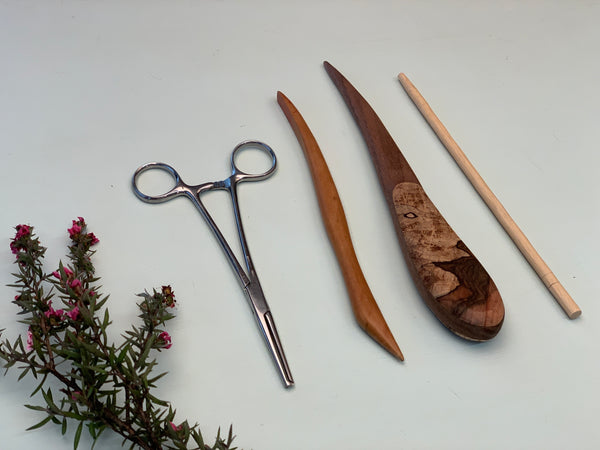 Haemostats, pictured centre left, are a great tool in your doll stuffing kit. Many long thin tools can also work effectively to assist in stuffing, such as point turners and clay carving tools (far right).
![]()
Stuffing your Toy:
- Take your time, and enjoy the process! Going too quickly and putting large pieces of stuffing in all at once will cause uneven lop sided shapes. Lumps, gaps, too-soft sections and odd bulges are usually symptoms of trying to stuff at speed. Using small quantities of stuffing means you will be able to spread them more easily and really work them into shape, massaging the pieces as you go.
It is easy to unintentionally leave gaps or extra soft parts in the ends of limbs, in fingers and small similar areas. Using very small pieces of stuffing and packing them in carefully to those areas will help give you the best result!
- When approaching stuffing your toys, look for the smallest and pointiest parts to stuff first. Heels and toes, hands, ears, tail tips for animals and the like. Methodically work to fill these sections before stuffing the rest, working the parts that are furthest from the stuffing gap first.
Tools like haemostats and stuffing forks as mentioned above really shine when stuffing tighter areas like this.
It can also help to shape your fluff to the shape it will be inside the toy, but larger so that it can be compressed as you insert it into place. Mould and shape each part as you go to make sure it's not lopsided and that everything is looking even.
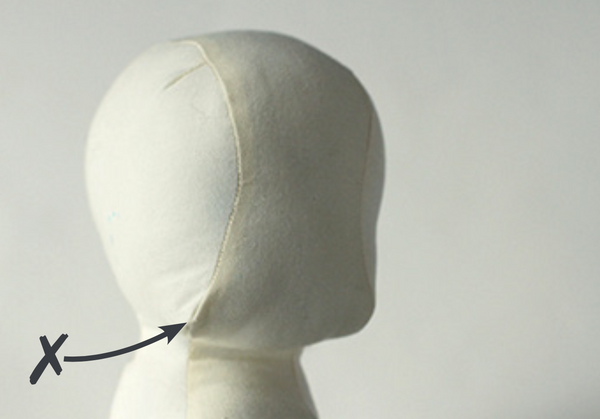
This is an example of a poorly stuffed jaw line in a Classic Cloth Doll. You can see the stuffing has not filled in those lower cheeks.
- Remember that you will likely need to stuff your toy much more than you think! If you’re new to making soft toys, you might be surprised at how much stuffing is required to create a great looking toy. It may help to think about a handmade toy as a soft sculpture, intended for play. You are the sculptor giving your art piece form from the inside!
Keep stuffing until your toy is firm - although not so stuffed that the fabric stretches and the stitches become pulled and possibly burst the seams. I aim for the firmness of a ripe orange. You need the body parts to keep their shape and to support the toy when it stands, but you don’t want the toy to be too hard, and uninviting to play with.
![]()
I hope this guide has helped you with your toy stuffing process.
One of the joys of handmade toys is that no two toys are exactly alike, and they all have their own special personalities. So find a nice seat, in a cosy place, and stuff your new creation with confidence as you get to know them!
![]()
Read more Twig + Tale sewing tutorials here:
- Free Bunny Pattern
- Free Toadstool Ornament Pattern
- How to make Felted Snowdrops
- T+T Storytellers: On the importance of open-ended play