Do you find that garments tend to pull or feel a bit tight across the shoulders? This simple pattern adjustment will help you modify your Fable Dress for a perfect fit, with enough ease to allow for unrestricted movement. It takes just a little bit of extra time, but is so worth the effort when the result is a garment customized just for you.
This method can also be used to adjust the shoulder width of the Men's / Straight Fit Pathfinder.
![]()
Materials
- Side Front, and Back Fable Dress pattern pieces
- Measuring tape
- Scrap paper
- Tape
- Pencil
Measure
Begin by measuring your back to determine the size of shoulder adjustment you will need to make.
Measure across the top of your back from the crease where the top of your arm joins your back, from one side to the other. This is easiest if you get someone to help you measure.

Work out the shoulder to shoulder difference between your body measurement and the pattern finished garment measurement. The finished garment measurement can be found in the pattern tutorial, or you can measure the pattern piece.
For example:
- Your body measurement = 46cm
- Finished garment measurement = 40cm
- Difference = 6cm
Since the pattern piece you will be working with is half the width of the back, divide the difference measurement in half. In our example, this would be 3cm. This will be your pattern adjustment measurement.
Adjust pattern pieces
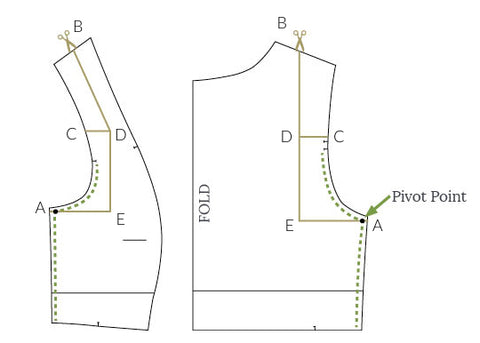
1. Mark lines and cut pattern pieces as indicated in the diagram below.
First, mark the seamline on both the Side Front and Back pattern pieces (indicated by the dotted line in the illustration below) at underarm to create a pivot point.
Then, mark the Side Front as follows:
- Draw a line about halfway down the armhole (point C to D).
- From the centre of the shoulder (point B), draw a line that follows the angle of the pattern piece, until it meets point D.
- Pivot at point D and draw line that follows grainline of fabric.
- Draw a line across pattern piece from pivot point (point A) so that it intersects with line drawn in previous step. This creates point E.
Then, mark the Back as follows:
- Mark a point at the centre of the shoulder (point B).
- Draw a line parallel to grainline, running down from centre of shoulder (point B) until it is even with point A.
- Draw a line from the pivot point to intersect with line drawn in previous step. This creates point E.
Cut the pattern piece along these lines.
2. Slide the top shoulder piece over the amount determined in the pattern adjustment measurement calculation above (eg. 3cm in our example).

3. Leaving the top shoulder piece positioned as in step 2, pivot the bottom section only so that outer corner meets the section you slid over in the previous step.

4. Adjust the top piece, sliding it up or down so that the armhole stays the same length.

5. Blend seam lines and smooth. Re-mark the single and double notches to indicate the front and back pieces.

The pattern pieces have now been adjusted to your custom measurement. Before cutting into your fancy Fable Dress fabric, we recommend sewing a muslin to test out the new shoulder adjustment, ensuring a comfortable fit with enough ease for unrestricted movement.
![]()
Read more about the Fable Dress here
- Introducing the Fable Dress
- How to Make a Maxi Length Fable Dress
- How to Make a Simple Front Fable Dress
- How to do a FBA or SBA for the Fable Dress
- How to Add Ruffles to the Fable Dress
- How to Sew a Patch Pocket
- How to Add Piping to a Princess Seam
~ Lovely cover image by Emmaline Fenner ~