A beautifully-fit princess seam provides lovely, smooth shaping to a garment. Here are step-by-step instructions for making an FBA (full bust adjustment) or SBA (small bust adjustment) to a garment with princess seam shaping, such as the Fable Dress, Women's/Curved Fit Pathfinder Vest, Flourish Dress Coat, and the Bloom Jacket. It can also be used to adjust the Trailblazer Vest and the Forester Coat.
Materials
Gather some basic materials to adjust the pattern pieces:- Side Front and Centre Front pattern pieces (we're demonstrating with the Fable Dress and the Women's/Curved Fit Pathfinder Vest)
- measuring tape
- scrap paper
- tape
- pen/pencil
Measure
To determine the size of adjustment necessary, measure your high bust and full bust.
The upper bust measurement is taken around the body, with the tape snugged up to the underarms, and above the breasts.
The full bust measurement is taken around the fullest part of the breasts.

Compare your body measurements to the size chart (click here to view, or it can be found on page 10 of the women's Fable Dress tutorial).
| Size H | Your body measurement | |
| Upper Bust measurement | 34" | 34" |
| Full Bust measurement | 36" | 38" |
Bust Apex
The bust apex is marked on the pattern. It is a good idea to measure your own bust apex to make sure that the curve of the princess seam is in the correct position for your body.
To find your personal bust apex, measure from the outside corner of the body on the shoulder bone (the position where a shoulder seam line would sit) to the centre of your bust - this is the part that points out the most. Note that the bust apex is not necessarily the same as your nipple position. We recommend taking this measurement while wearing your favourite underwear.

Check your measurement against the pattern. Measure the pattern from the stitching line on the outside corner of the shoulder seam to the bust apex point marked on the pattern.
Make a note of the difference between your bust position versus the pattern.

If your bust apex differs from the pattern, you will need to lengthen or shorten the pattern between the shoulder and the bust apex so that the pattern curve for the bust is in the correct position for your body.
To do this, cut across the pattern both above and below the bust curve.

Keeping the top and bottom parts of your pattern pieces in place, move the central piece you have just cut up or down by the difference between your body and the pattern. Use a piece of scrap paper to tape the changes in place and blend the lines.

Full Bust Adjustment
Adjust pattern pieces
1. Begin by adjusting the Front Side pattern piece. Mark in the stitching line on the top corner of the Front Side piece. Draw a line parallel to the grainline from the stitching line point to the hem. Draw a line across to the bust apex from the first line. Then, draw a line across the Front piece at the bust apex point.

2. Cut the lines drawn on the Front Side pattern piece from the hem up to the bust apex line, and along the bust apex line, leaving the top section uncut for now. Slide the cut out section over by the amount determined above (eg. 1" in our example).

3. Cut the rest of the line up to the top corner, up to but not through the stitching line, leaving a bit of paper intact to create a pivot point. Pivot out the top section of the side front until the lower corner is pivoted out by the same amount the lower section moved in step 2.
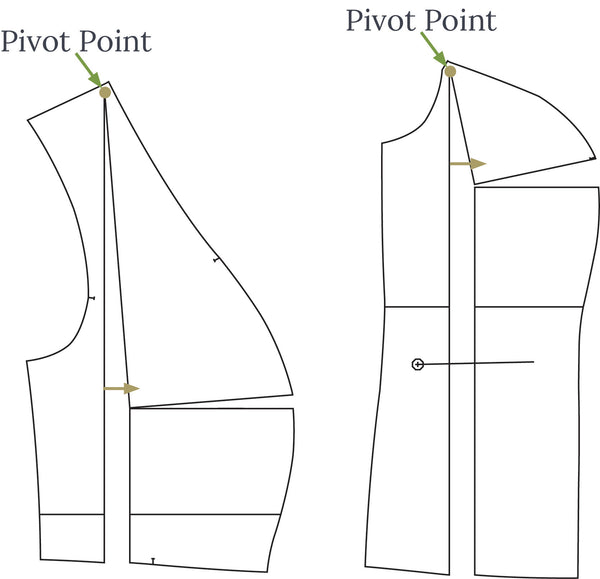
4. If modifying the Pathfinder pattern, pivot the lower section from the bust to the hem so that no extra width is added in at the hem. However, if you also need to do a Full Abdomen Adjustment, then you can leave the lower section parallel to add more width to the abdomen. If sewing the Fable, leave the lower section parallel so that you are still able to pull the waist seam over your bust when dressing.
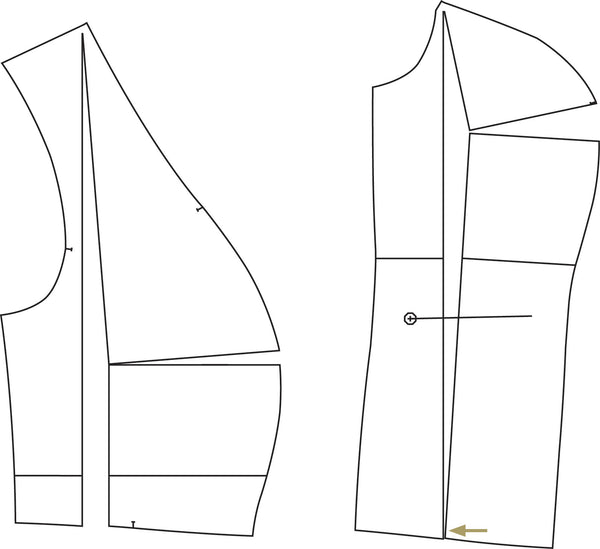
5. Mark the stitching line on either side of the gap at the bust, then measure the gap between the stitching line ends.

6. Cut across the Centre Front pattern piece at the bust apex notch. Slide the lower section of Centre Front piece down until the gap is equal to the gap on the side front piece, measured in step 5. Tape in place and redistribute the button markings to be even down the new length of the front edge.

7. Sew a muslin and to ensure that the bodice fits your body properly. If your full bust is is 6" greater than the size chart for your size you may need to add some width into the Centre Front piece to account for bust point changes. In this case, you may wish to add 2/3 of the difference into the Side Front and 1/3 into the Centre Front.
8. If sewing the Fable Dress, there are two options for adjusting the skirt:
- leave the skirt as-is and have a little less gather in the front
- add the same amount to the foldline of the front skirt piece as was added to the side front

Small Bust Adjustment
The SBA works the same way as the FBA, but instead of sliding the pattern pieces out, the pattern pieces will be slid inwards to reduce volume in the curve.
Mark and cut the pattern pieces as described above in step 1.
Slide the cut out section on the Side Front pattern piece in by the amount determined (based on your measurements). Smooth and blend the line.
Determine the new length of the stitch line to the notch, then slide the bottom portion of the Centre Front pattern piece up.

Use your adjusted pattern pieces to cut and sew the garment as outlined in the pattern tutorial. We hope you enjoy wearing clothing that is custom fit to your body!
Please feel free to join us at the Twig + Tale Facebook group where you can ask questions, look for inspiration, and of course share photos of your creations.
![]()
Read more about the Fable Dress here:
- Introducing the Fable Dress
- How to Make a Maxi Length Fable Dress
- How to Make a Simple Front Fable Dress
- How to do Broad Shoulder Adjustment for the Fable Dress
- How to Add Ruffles to the Fable Dress
- How to Sew a Patch Pocket
- How to Add Piping to a Princess Seam