Sizing up to accommodate a fuller abdomen can result in excess fabric around the shoulders and bust, resulting in a poor fit. Use this pattern adjustment to add extra ease to a top pattern just where it's needed, while still maintaining a good fit around the bust and shoulders.
This adjustment can also be used for adapting a garment for pregnancy.
Here, we demonstrate using the Scenic Top, however this method will work for the Vista Top, Plains Dress, or any top with bust dart shaping. This method can also be used to adjust the Ridgeway Top (for Ridgeway, disregard references to bust darts and skip steps 1-3).
![]()
Materials
Gather some basic materials to adjust the pattern pieces:
- Top Front pattern piece
- measuring tape
- scrap paper
- ruler
- tape
- pen/pencil
- scissors
Measure
Determine your base size using the upper bust measurement from the pattern size chart.
Then, measure your waist. Locate the size that corresponds with your waist measurement on the size chart.
- If your waist is 2-3 sizes larger than your upper bust size on the size chart, you can simply blend out by one size at the waist to give a little more ease around the waist (see the pattern tutorial for blending waist sizes).
- If your waist measurement is greater than 3 sizes larger than your upper bust size, then you will need to do a full abdomen adjustment. This adjustment gives the best fit if waist fullness is mostly to the front of your body.
- For the Twig + Tale Plains Dress, and Scenic & Vista Tops if you require a difference of 7 3/4" (20cm), you may also consider our Fuller Abdomen + Pregnancy Add-on, so that this adjustment is done for you.
To calculate the adjustment to make, determine the difference between the waist measurement in the pattern and your actual waist measurement.
Example:
Our sample sewist has an upper bust measurement of 51" (129.5cm) and a waist measurement of 54 3/4" (139cm).
We would use the upper bust measurement to determine that their base size will be Size O. Then we'll look up the waist measurement for Size O in the chart, which is 47" (119.5cm). To find the difference, we'll subtract the Size O waist measurement from their actual waist measurement.
- Actual waist measurement = 54 3/4" (139cm)
- Size O waist measurement = 47" (119.5cm)
- Difference = 7 3/4" (19.5cm)
We will need to add a total of 7 3/4" (19.5cm) to the front pattern piece.
Since the pattern piece is half the width of the front (because it is cut on the fold), divide the difference in half. In our example, this would be 3 7/8" (9.7cm). This will be the pattern adjustment measurement.
Adjust pattern pieces
*Note, for Ridgeway Top only: skip steps 1-3. Draw a line across Front A at the horizontal chest seam and slice it off entirely. Slice down from the horizontal chest seam line approximately a quarter of the way into the pattern piece on each side. From there, work from step 4, treating the side pieces as Section A in the tutorial, and the central pattern piece as Section B.
1. Draw two lines on the Front pattern piece:
- One line perpendicular to the centre front, from the dart end to the centre front.
- One line from the dart end to the hem, running parallel to the centre front.
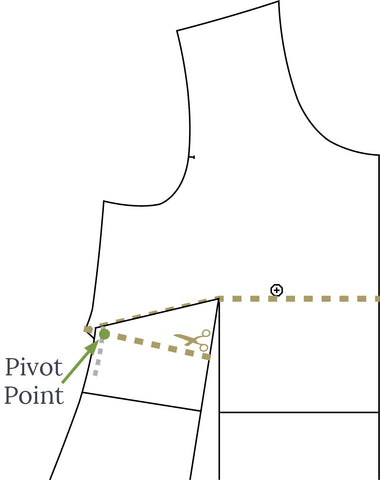
Cut along these lines up to but not through the dart point, leaving a bit of paper intact to create a pivot point. Then, cut through the lower line of the dart, again leaving a bit of paper intact.

2. Pivot the lower side section until it aligns with the halfway point of the dart, reducing the dart by half. Tape in place.

3. Draw a line below the dart, creating a wedge-shaped section (indicated by the dotted line with scissors in the illustration below). Then, mark the seam allowance along the side seam.
Cut the line from each end of the wedge-shaped section up to but not through the seam allowance mark, indicated by the green dot and arrow in the illustration below. This will create a pivot point without impacting the length of the side seam.

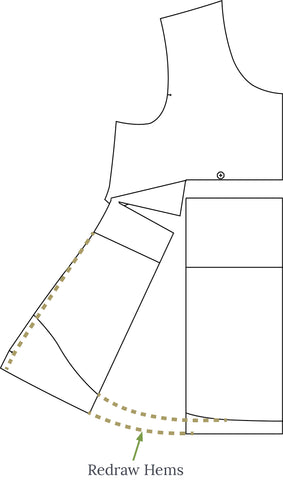

Remember that it is always a good idea to sew a muslin to test your adjusted pattern pieces before cutting into your fancy fabric.
Please feel free to join us at the Twig + Tale Facebook group where you can ask questions, look for inspiration, and of course share photos of your creations.
Read more pattern adjustment tutorials here:
- Fuller Arm Adjustment for a Set-In Sleeve
- How to do an FBA or an SBA for a Top Shaped with Darts
- Shoulder Width Adjustment for a Top with a Set-In Sleeve
- Fuller Abdomen Adjustment for Non-Darted Tops