This pattern adjustment is for folks who need assistance with dressing due to long or short term mobility restrictions, transforming any pull-over top into a garment that opens completely at the back. This makes dressing easier and more comfortable for both the wearer and anyone providing assistance, eliminating the need to pull a top over the head or navigate complex arm movements.
Materials
Gather some basic materials to adjust the pattern pieces:-
Back, Front, and any Collar or Facing pattern pieces
- scrap paper
- tape
- pen/pencil
- Optional: French curve or flexible ruler
Method
1. On scrap paper, mirror the Back, Collar and Facing pieces (if the style you are using has a collar and/or back neck facing).

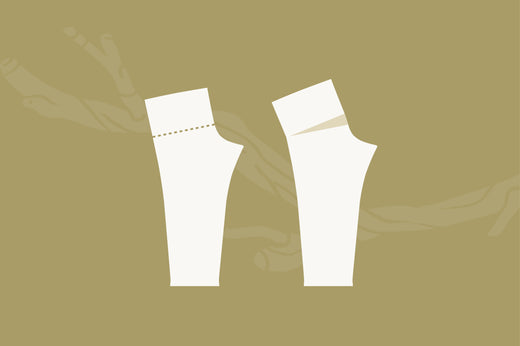
2. Draw a straight line parallel to the grainline 2 ¼" (6cm) from the neck edge on one side of the neck. This line will indicate the edge of the overlapping pieces. Copy this line onto the facing (if applicable).
If you wish to make the overlap wider, then draw the line closer to the shoulder, taking note of seam allowances.
If there is a back neck facing, transfer this line onto one side in the same position. You may find it easiest to simply lay your back neck facing onto your Back piece and trace.
If your garment has a collar, draw a line 3/8" (1cm) past the shoulder notch on one side of the Collar pattern piece.

3. At the bottom hem of the Back piece, you can choose to curve off the line (see an example of the curved option below), or simply keep the line straight. A French curve or flexible ruler can help make creating a smooth curved line much easier.
Cut all the pattern pieces along the newly drawn lines. Discard the thin section you have cut away.

4. With the new Back pattern piece created, you will now need to change the cutting instructions to "Cut 1 Mirrored Pair". We recommend noting this on the pattern piece(s), and anywhere else you may refer to in the future.
If your garment uses a collar and back facing, additionally change the cutting instructions to:
- Collar "Cut 2 Mirrored Pairs"
- Back Facing "Cut 1 Mirrored Pair"
If your garment uses neck binding, cut 8" (20cm) of extra binding.
5. For Collared Tops: Choose between closing your collar with hook and loop tape, snap domes or buttons.
If using buttons, you may use either loops or buttonholes as fastening options.
If using hook and loop tape or button loops, you will need to sew these to the collar pieces BEFORE sewing the collars closed. The loops will be sewn into the ends cut off by the shoulder notch.
The hook and loop tape will be sewn on the back section of the collars, close to each shoulder seam. The hook halves of the tape for the under collar will be sewn on the outside layer, and for the over collar, loop tape will be sewn on the inside layer of the collar.

For Bound Neck Tops: bound neck tops can be closed with buttons + loops or hook and loop tape. If you want to use snap domes or buttons, you will need to add some reinforcing interfacing behind the fabric to prevent the domes/buttons tearing through.
6. Memory press the edge you created on your back piece 3/8" (1cm) towards the wrong side, and then 3/8" (1cm) again, enclosing the raw edge. If you curve the bottom corner, you may decide to do a smaller memory press to get around the curve 1/4" + 1/4" (6mm + 6mm).
Let the fabric cool, then open the memory presses up to continue.

7. Once pieces are cut and closure method decided, proceed with sewing the garment as described in the tutorial. Pictures in the tutorial will show one back neck, however your garment will have two back necks.
If you have a collar piece then close the ends of the collar before sewing to the neck edge. The collar end will stop at the shoulder seam.
If your back neck is bound, the binding will end at the shoulder raw edge on the free side of the neck.
8. For a Button + Loop closure: Before sewing the free shoulder edge and side edge on the back, you will need to add a button loop to the outer corner of the shoulder seam. Position the loop next to the inner memory fold.
For a Hook and Loop Tape closure: This can be added to the shoulder at the end:

9. For a Collar and Back Neck Facing garment: Using the method described in your garment's tutorial, sew the collar and back neck facing to the neck edge.
Now use the Back Neck Facing to close the shoulder and side edge. Use a 3/8" (1cm) seam allowance along the shoulder, then, switch to using a 7/8" (2cm) seam allowance on the long side edge. You will be sewing along the inner memory fold.
As per your tutorial instructions, the lower edge of the facing should be memory pressed onto the wrong side of the facing

10. Clip the corners and turn the facing through. Your back neck should look like this:

With the wrong side of the Back and the right side of the Back Neck Facing up, topstitch 1/8" (3mm) around facing's folded edge, then 1/8" (3mm) topstitch down and around the back outer folded edge. Hem the Back and Front hems at the same time as described in the garment tutorial.
If doing a curved corner then continue topstitching onto hem.
11. For a Bound Neck garment: Using the method in your garment's tutorial, bind the neck. The binding will begin and end at each raw shoulder edge.
Topstitch 1/8" (3mm) down the back folded outer edge. Hem the Back and Front hems at the same time in the manner described in the garment tutorial.
If doing a curved corner then continue topstitching onto the hem.
If using button + loops as your closures, then add the loops to the shoulder seam now.

12. Sew binding to the shoulder seam using the same technique as the neck and tuck the ends under at each end when folding the binding around the raw edge of the shoulder

13. Fold binding under on shoulder seam and topstitch closed as you did with the neck binding.

For a Button + Loop closure: Mark the position and sew buttons to the neck or collar and shoulder seam to match loop positions.
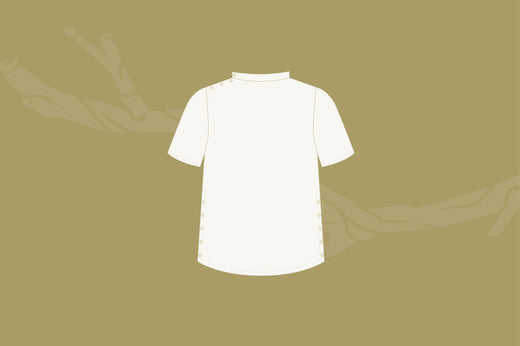
The garment will look similar to this with a collar:

And like so with a bound neck:

For a Hook and Loop Tape closure: Sew hook and loop tape to shoulder area at the end.
The garment will look similar to this with a collar:

And like so with a bound neck:

Enjoy the look of a "pull over" style with a back that opens fully for easy dressing.
Please feel free to join us at the Twig + Tale Facebook group where you can ask questions, look for inspiration, and of course share photos of your creations.
![]()
Read more about adaptive pattern adjustments here: