We love our pull-on woven tops here at Twig + Tale® - they're designed to be quickly slipped on before heading out the door on a summer adventure. But we know that pull-over styles can sometimes present challenges for people with mobility differences, sensory sensitivities, or other needs.
Materials
Gather some basic materials to adjust the pattern pieces:-
Back, Front, and any Collar or Facing pattern pieces
- scrap paper
- tape
- pen/pencil
- Optional: French curve or flexible ruler
Where to add an opening
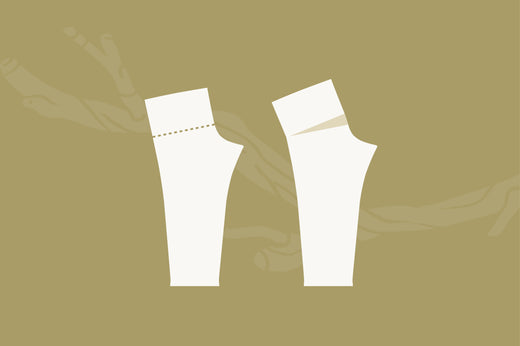
The first step is to decide which seam you would like to add an opening in. The following examples may help you make the best decision for your wearer's body:
- A shoulder opening will give more room for the head, but afford no additional movement for the arms and shoulders.
- A side opening will allow a lot more movement for arms and shoulders, but no more room for the head.
- An underarm opening will give more movement for arms and shoulders, but less than the side opening.
Note: an underarm opening or shoulder opening are good options for creating openings for medical tech accessibility.
Method - prepare fabric strip
Begin by cutting a strip of fabric across the full WOF (width of fabric), 2 7/16" (6cm) wide.
Most lighter weight, woven fabrics used for tops are not strong enough to hold snap domes or buttons, so if using either of those closures then we recommend interfacing your strip. You may not need the full width of your fabric but it's good to start with more than you will need.
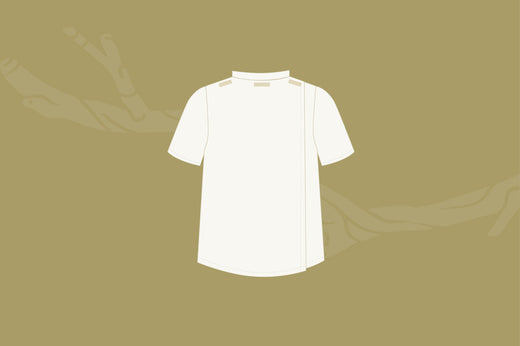
Sewing a Shoulder Opening
1. For a Top with a Collar: Split the collar pattern at one of the shoulder notches and add a 3/8" (1cm) seam allowance to each side of the split:

Cut 1 mirrored pair of each side of the collar. Sew the neck as described in the garment's base tutorial, leaving one shoulder open.
Leave all all layers of the collar and facings raw, and baste to the shoulder raw edge with a 1/4" (6mm) seam allowance.


Sewing a Side Opening
Follow the same technique for the shoulder opening except that the closed ends of the strips will be at the hem edge.
1. Hem the top BEFORE sewing the strips to the side seam. You can catch the other ends of the strips in the armhole seam. If you prefer to finish the opening beyond the armhole seam or partially up the side seam, clip into the seam allowance of the side seam at the point you wish to finish the strip, then close the strip at the clipped point. You will need to topstitch through the ends of the strips to hold them in position and reinforce the seam end (which has been clipped).


Please feel free to join us at the Twig + Tale Facebook group where you can ask questions, look for inspiration, and of course share photos of your creations.
![]()
Read more about adaptive pattern adjustments here:
- Adaptability to Over Head Patterns: Sensory Overlap Back Opening
- How to add a Split Back to Coats - Grove, Pixie Coat
- How to Create a Cut-Out Back Coat for Fulltime Wheelchair Users - Grove, Pixie Coat